Generate a Textbook Adoptions report (Textbook Manager)
The Textbook Adoptions report gives you access to adoption information for your textbooks.
Choose to list textbooks adopted by your state or district during a certain year or range of years, those in current adoption, or those out-of-adoption. Include titles only, or titles and copies.
Consider running this report prior to removing textbook titles by adoption year in Catalog >Update Titles.
To generate the report:
- Select Reports> Textbook Reports.
- Under Catalog -- Titles & Copies, click Textbook Adoptions. The report setup page appears.
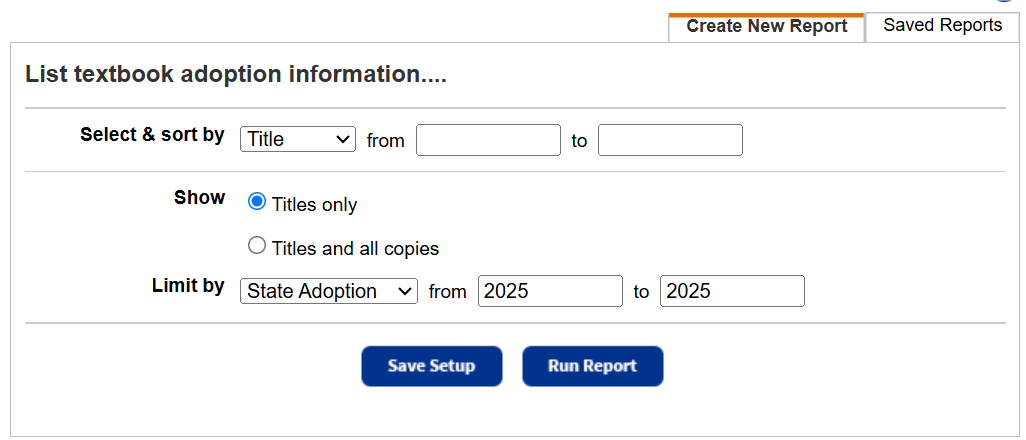
- Do any of the following:
- Next to Select & sort by, select Title, Publisher, or Vendor.
Note: If you sort by vendor or publisher, titles without vendor or publisher information are not included.
- (Optional) Enter a range in the from and to fields.
Notes:
- You can limit to one title, publisher, or vendor, or a range.
- All titles, publishers, or vendors: Leave both fields blank.
- One title, publisher, or vendor: Enter it in both fields.
Important: Enter the name of the primary textbook, not the supplement. - Up to and including a specific title, publisher, or vendor (alphabetically): Leave the from field blank, and enter it in the to field.
- A specific title, publisher, or vendor,and all those after it (alphabetically): Enter it in the from field, and leave the to field blank.
- You cannot use wild cards (?, *) in ranges.
- You can limit to one title, publisher, or vendor, or a range.
- Next to Show, select either:
- Titles only
- Titles and all copies:Includes individual copy details
- Use the Limit by drop-down to list:
- State Adoption: Textbooks that your state adopted in a particular year or range of years.
- District Adoption: Textbooks that your district adopted in a particular year or range of years.
- End Adoption: Textbooks that are in current adoption or out-of-adoption.
- State Adoption: Textbooks that your state adopted in a particular year or range of years.
- Next to the Limit by drop-down, enter a range in the from and to fields.
Note: You can limit to one adoption date, or a range.
- All adoption dates: Leave both fields blank.
- One adoption date: Enter the same date in both fields.
- Textbooks adopted before and on the date in the to field: Leave the from field blank, and enter a date in the to field.
- Textbooks adopted on a date and later: Enter a date in the from field, and leave the to field blank.
- Next to Select & sort by, select Title, Publisher, or Vendor.
- Do any of the following:
- To run the report now, click Run Report.
- To save the setup, click Save Setup. The Save Report page appears.
- Enter a name for the report.
Note: You must choose a name that is unique for the report at your school.
- Click either Save to save the report, or Save & Run to save the report and run it now.
- Enter a name for the report.
- To run the report now, click Run Report.
- When the report status is Completed, click View.
Work with Saved Reports
A saved report appears on the Saved Reports tab, where you have more options:
- Add to Favorites: Click
 . Reports saved to your My Favorites page show a favorite icon,
 .
. - Run: Click Run. Each time you run the report, the results reflect the current contents of your textbook inventory.
- Edit: Click
 . When you resave a report after editing (even with a different name), the original report setup is overwritten.
 - Duplicate: Click
 . This is a quick way to create one or more additional reports based on the original saved report's settings.
 - Delete: Click
 . Destiny notifies you if the report is a favorite of any other users. When you delete a saved report, previously run reports are not deleted from the Report Manager.
|
Notes:
|
Title Information includes:
- Title
- State/Textbook ID
- Publisher
- ISBN (if more than one, the first one is listed)
- Edition
- State adoption year
- District adoption year
- Year the adoption ends
- State/Textbook ID
Copy Information includes:
- Replacement price (If there is no replacement price in the title record, a double dash (--) appears.)
- Total number of copies
- Number of copies available
- Number of copies checked out
- Number of copies loaned out
- Number of copies on order
- Number of copies out for repairs
- Number of copies in transit
- Number of copies lost
- Numbers of new, good, fair, poor, and unusable copies
List Totals at the bottom include:
- Number of titles listed
- Calculated replacement cost for all the copies of the titles listed, regardless of copy status
- Total number of copies
- Total number of available copies
- Total number of copies checked out
- Total number of copies loaned out
- Total number of copies on order
- Total number of copies out for repairs
- Total number of copies in transit
- Total number of copies lost
- Total number of copies in each condition
If you choose to Show Titles and all copies:
- The copy details include a count for each Status, and each copy's barcode number and condition.
- The copies are listed in order of copy status (Available, Checked Out, Loaned Out, On Order, Out for Repairs, In Transit, and Lost), and then by the copy barcode number.
- If the copy is Checked Out, it includes the student's name, patron type, barcode number, and the due date.
- If the copy is In Transit, it includes the sending school's name.
- If the copy is Lost, it includes the date it was lost. If it was lost by a patron, it includes the patron's name, patron type, and barcode number.