Generate an Outstanding Textbooks Obligation report (Textbook Manager)
|
Important: Textbooks checked out by ISBN appear on this report. |
The Outstanding Textbook Obligations report shows all students who have textbooks checked out that are not needed for the current schedule, textbooks lost by students with no fine assessed, and textbooks lost by students with unpaid fines.
This report is best used at end of term after textbook collection or beginning of term prior to textbook distribution.
| Important: To generate a meaningful report, your school or district must have set up the classes and their sections, and assigned students and resources to them in Update Classes. |
To generate the report:
- Log in as a district user with site access or a site user.
- Select Reports > Resource Reports.
- In the Circulation section, click Outstanding Textbook Obligations. The reports setup page appears.
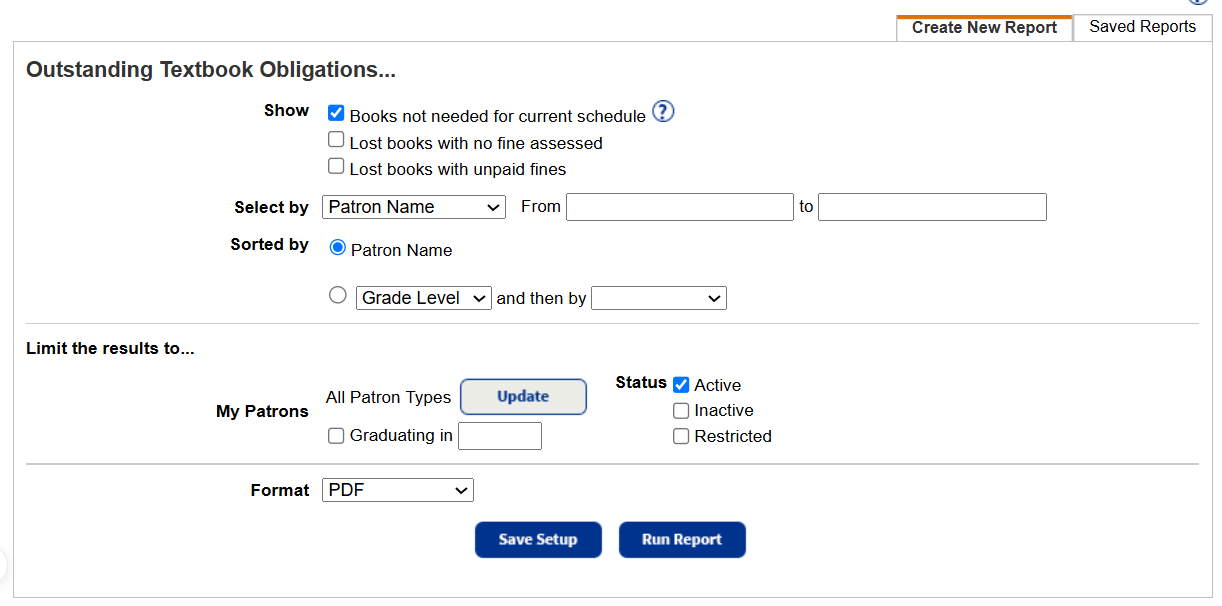
- Do any of the following:
- In the Show section, choose what to include in the report.
- Books not needed for current schedule: Includes patrons who checked out a textbook for a current class, then dropped the class and did not return the book.
- Lost books with no fine assessed: Includes information for any textbook that was lost, had a fine assessed, and then the fine was subsequently waived.
- Lost books with unpaid fines:
Includes lost books with no fines assessed, lost books with unpaid fines, or both.
- Use Select by to choose a method for identifying the range of patrons to include.
- In the From and to fields, enter a range.
Notes:
- You can limit to one name or number, or a range.
- All names or numbers: Leave both fields blank. For Homeroom, use Any Homeroom.
- One name or number: Enter the same name or number in both fields.
- Up to and including a specific name (alphabetically) or number: Leave the From field blank, and enter it in the to field.
- A specific name (alphabetically) or number and all those after it: Enter it in the From field, and leave the to field blank.
- You cannot use wildcards (?, *) in ranges.
- You can limit to one name or number, or a range.
- Use the Sorted by section to decide how to sort the report. Choose Patron Name, Grade Level, Homeroom, or one of the User-Defined fields. You can also sub-sort the copies by a second field.
- In the Limit the results to... section, select the patron types and statuses to include.
- The Graduating in field lets you limit by a graduation year.
- From the Format drop-down, choose either PDF or Microsoft Excel.
- In the Show section, choose what to include in the report.
- Do any of the following:
- Click Save Setup:
- In the Save As field, type a name for the report or notices.
- From the Schedule Report drop-down, select Do Not Schedule if you do not want the report to run automatically. To schedule the report to run on a daily or weekly basis, select accordingly, and then select the day and/or time you want them to run.
Note: If you do not want the report or notices to run on closed days, select the Do not run on closed days (Closed: Sunday, Saturday) checkbox.
The saved report or notice setup appears on the Format page, in the Saved Report/Notices list at the top.
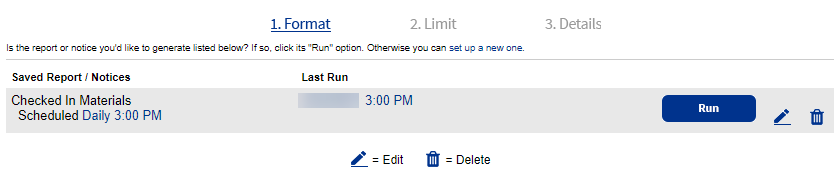
- Click Run Report. Report Manager displays your report at the top of the list. The status automatically updates.
- Click the View link to see the report, notices, or status of the email notices.
- When the status of the job is Completed, click View to see the report, notices, or status of the email notices.
- Click Save Setup:
Work with Saved Reports
A saved report appears on the Saved Reports tab, where you have more options:
- Add to Favorites: Click
 . Reports saved to your My Favorites page show a favorite icon,
 .
. - Run: Click Run. Each time you run the report, the results reflect the current contents of your textbook inventory.
- Edit: Click
 . When you resave a report after editing (even with a different name), the original report setup is overwritten.
 - Duplicate: Click
 . This is a quick way to create one or more additional reports based on the original saved report's settings.
 - Delete: Click
 . Destiny notifies you if the report is a favorite of any other users. When you delete a saved report, previously run reports are not deleted from the Report Manager.
|
Notes:
|
Report content
For each patron, the report includes:
- Patron name
- Patron type
- Patron barcode number
- ISBN
- Grade
- Homeroom
For each copy, the report includes:
- Title
- ISBN
- Copy barcode number
- Copy status
- Due date