Generate a Shelf List
The Shelf List presents the copies in your collection in the order they should appear on the shelves. Use this report to find books that are out of order, or compare the items on shelves against the results of an inventory.
For help deciding what to weed, based on which books are circulating and when books were purchased, limit the report by:
- Call numbers
- Number of circulations in a date range
- Sublocation (Library Manager only)
- Date acquired (Library Manager only)
To generate the report:
- Select Reports > Library Reports or Reports > Media Reports.
- Under Catalog -- Titles & Copies, click Shelf List. The report setup page appears.
- Do any of the following:
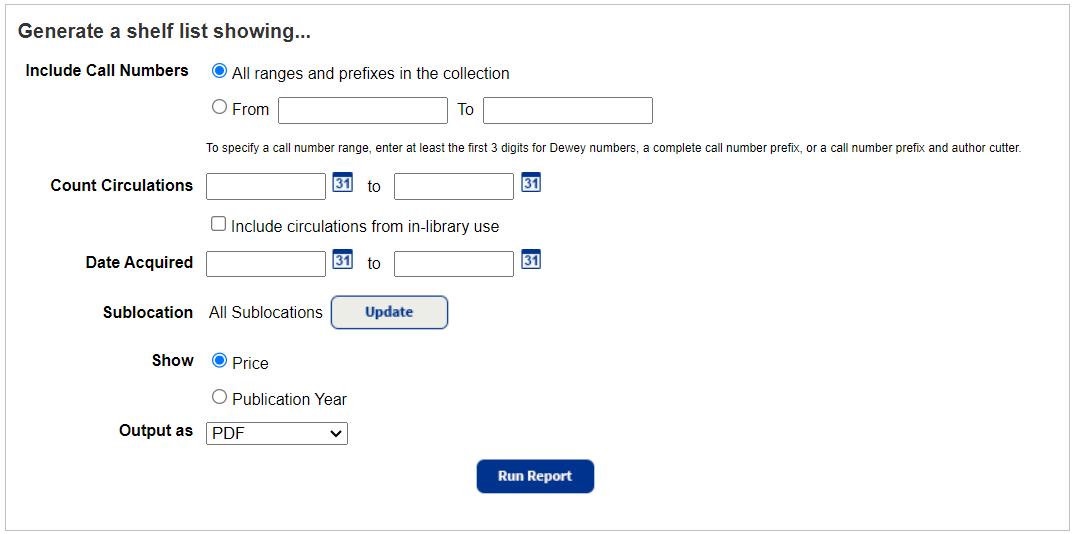
Field Description Include Call Numbers - To report on your entire collection, next to Include Call Numbers, select All ranges and prefixes in the collection.
- To report on just a section, enter a call number range in the From and to fields.
Notes:
- Destiny assumes that any 3-digit number you enter is a Dewey number, and anything else, a call number prefix.
- You can limit to one call number or a range.
- All call numbers: Leave both fields blank.
- One call number: Enter the same call number in both fields.
- Up to and including a specific call number (alphabetically): Leave the From field blank, and enter a call number in the to field.
- A specific call number and all those after it (alphabetically): Enter a call number in the From field, and leave the to field blank.
- You cannot use wildcards (?, *) in ranges.
Count Circulations - To restrict circulation statistics to a range of dates, enter beginning and ending dates, or click
 next to Count Circulations.
Note:You can limit to one date or a range.
- All dates: Leave both fields blank.
- One date: Enter the same date in both fields.
- Up to and including a specific date: Leave the From field blank, and enter a date in the to field.
- A specific date and all those after it: Enter a date in the From field, and leave the to field blank.
- To Include circulations from in-library use, select the checkbox.
Date Acquired To limit the report to when the copies were purchased, using a range of dates, enter beginning and ending dates or click
next to Date Acquired.Notes:
- The Date Acquired field is only available in Library Manager.
- You can limit to one date or a range.
- All dates: Leave both fields blank.
- One date: Enter the same date in both fields.
- Up to and including a specific date: Leave the From field blank, and enter a date in the to field.
- A specific date and all those after it: Enter a date in the From field, and leave the to field blank.
Sublocations Click Update. The Select Sublocations page appears.
- Click Clear All to remove all or Select All to add all sublocation checkboxes.
- Select the sublocations to see in the report.
- Click OK. The selected sublocations appear in the Sublocation section.
Show Select Price or Publication Year. Output As Select a report format:
- Microsoft Excel
- Click Run Report.
Additional Details
The report can include:
- Call number
- Author
- Title
- Barcode number
- Purchase price or publication year
- Date acquired
- Sublocation(s)
- Copy status
- Available
- Checked Out
- Loaned Out
- On Hold
- In Processing
- Out for Repairs
- In Transit
- Lost
- Returning
- Follett eBook
- Number of circulations for each included copy
Sort Order
The PDF output sort order is: call number, title/author, barcode, price, date acquired, status, sublocation, and then circulations.
The Microsoft Excel output sort order is: call number, author, title, barcode, price, currency code, date acquired, status, sublocation, and then circulations.